Beekeeping equipment list: everything you actually need for your first year
A complete first-year beekeeping equipment list by budget tier, with a buy-once vs consumable breakdown and a build-your-own cost planner.
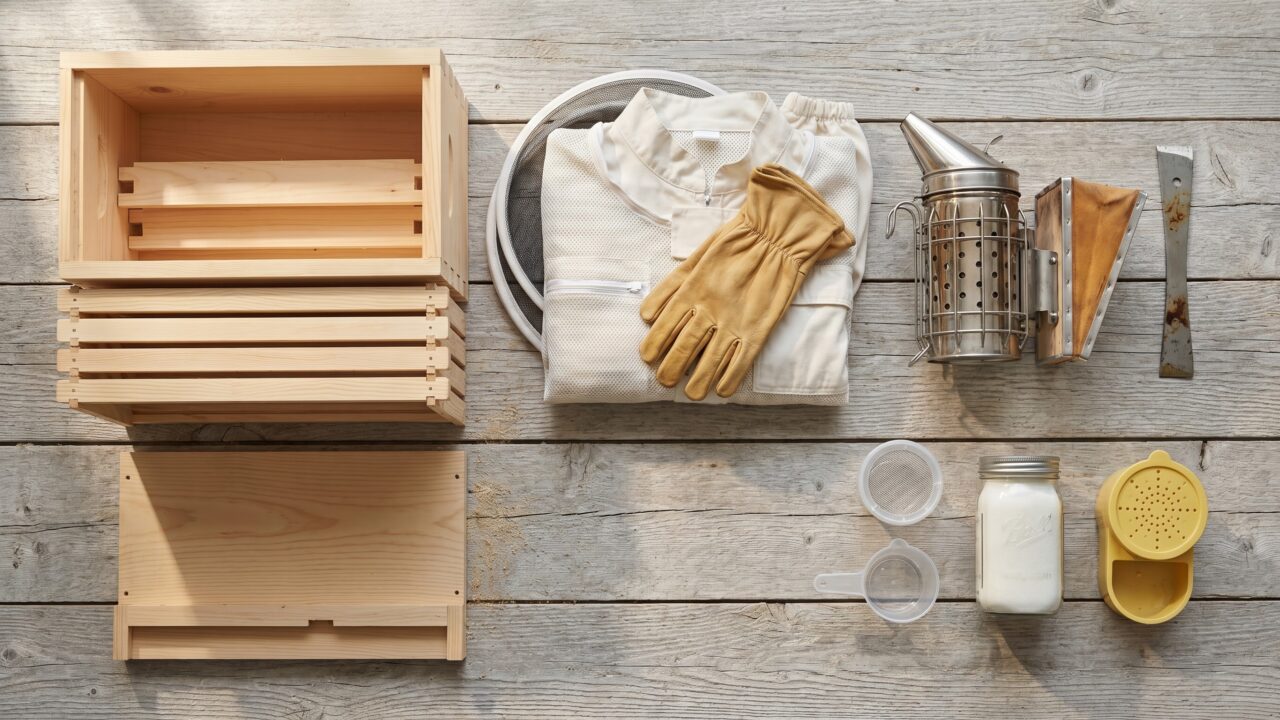
The honest version of a first-year beekeeping equipment list has five parts: a hive, protective gear, a few hand tools, a varroa mite kit, and feed. Buy those well and you can keep bees. The trap most beginners fall into is the "$150 starter kit," which is one line on a longer bill. Once you add bees, a suit, a mite test, sugar, and the boxes you will need by midsummer, a realistic first year lands somewhere around $750 to $1,500 all in. Even at the bare minimum, Oklahoma State University Extension still puts the first-year total near $520, and that is before you have bought anything comfortable. This page lays out the whole list, splits it into buy-once gear versus things you will keep rebuying, and gives you a way to price your own setup.
One number shapes every choice below. US backyard colonies (operations with fewer than 50 hives) have been dying at roughly half per year lately, and the 2024-2025 national survey put backyard losses near 51%. So plan for replacement bees as a recurring yearly cost. Gear lasts. Bees often do not.
The five things every first-year setup needs
Strip away the catalog and a working setup comes down to these five groups. Get all five before your bees arrive; a kit that skips the mite tester or the feeder is not actually complete.
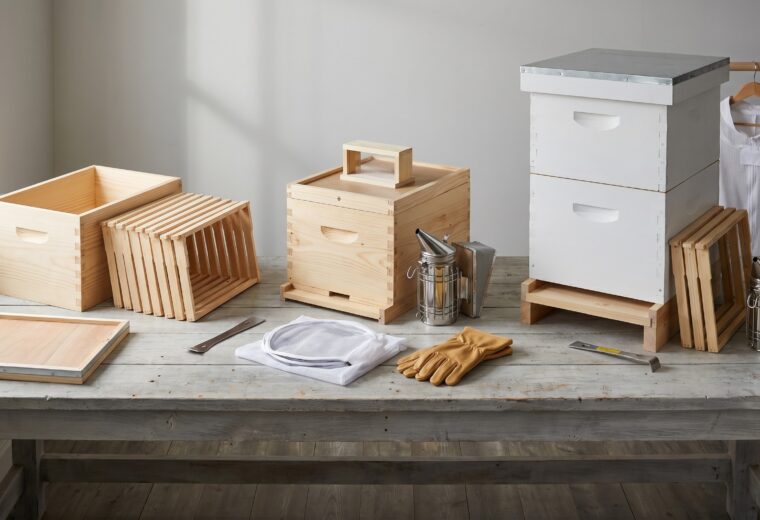
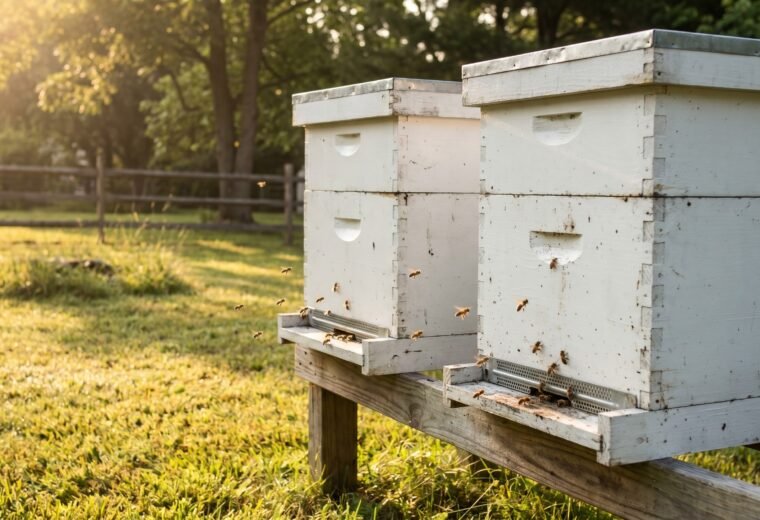
- The hive. A Langstroth hive is the US standard: a bottom board, one or two deep boxes for the brood nest, frames with foundation, an inner cover, and a telescoping outer cover. The hive body is the wooden box that holds 10 frames of comb (8-frame boxes hold eight and weigh less). A complete kit runs about $200 to $400.
- Protective gear. At minimum a veil to keep stings off your face and neck, plus gloves. Most beginners want a full jacket or suit for the first season while their nerve settles. The University of Georgia bee program notes a veil and gloves protect the head and arms from stings. Treat that as the bare floor and add a jacket or suit on top of it.
- Hand tools. A smoker and a hive tool. UGA calls the smoker the most valuable tool for working bees, and the hive tool is the flat pry bar that separates frames the bees have glued down with propolis.
- A varroa mite kit. An alcohol-wash cup or sugar-roll jar so you can count mites. This is the cheapest item that decides whether your colony lives. More on why below.
- Feed. Sugar for syrup, plus a feeder. A new colony almost always needs feeding to draw comb in its first weeks.
If you want the assembled-kit shortcut, the trade-offs between the all-in-one boxes are laid out in our look at starter kits, which covers what those bundles include and where they skimp.
Buy-once gear versus what you will keep buying
The single most useful way to read an equipment list is to split it by how often you pay for it. Durable gear is a one-time hit that lasts years. Consumables and livestock are a yearly line, and bees are the biggest yearly line of all. Here is the same list, sorted that way.
| Item | Type | Rough cost | How often you buy it |
|---|---|---|---|
| Complete Langstroth hive (boxes, frames, covers, bottom board) | Buy-once | $200-$400 | Lasts years; add boxes as the colony grows |
| Bee suit or jacket and veil | Buy-once | $40-$160 | Several seasons with care |
| Gloves | Buy-once-ish | $10-$30 | Replace when worn or stiff |
| Smoker | Buy-once | $25-$50 | Lasts years |
| Hive tool | Buy-once | $8-$20 | Buy two; you will lose one |
| Mite-test kit (alcohol wash or sugar roll) | Buy-once | $10-$30 | Reusable cup or jar |
| Feeder | Buy-once | $10-$40 | Lasts years |
| Bees (package or nuc) | Consumable / livestock | $140-$300 | Yearly while losses run high |
| Sugar for syrup | Consumable | $20-$50/season | Spring and fall, ongoing |
| Mite treatment (per label) | Consumable | $15-$50/year | At least once a year, late summer |
| Smoker fuel | Consumable | Cheap or free | Every time you light it |
Read down the buy-once column and you see why year two costs so much less than year one: the big purchases are already on your hands. What remains is bees, sugar, and a mite treatment. Oklahoma State Extension sorts a beginner's spending into six buckets (hive, hive accessories, bees, equipment, supplies, and miscellaneous), and that same shape holds whether you spend $520 or $1,400. The categories do not change; only the quality and quantity do.
The hive: standard, lightweight, or the Flow question
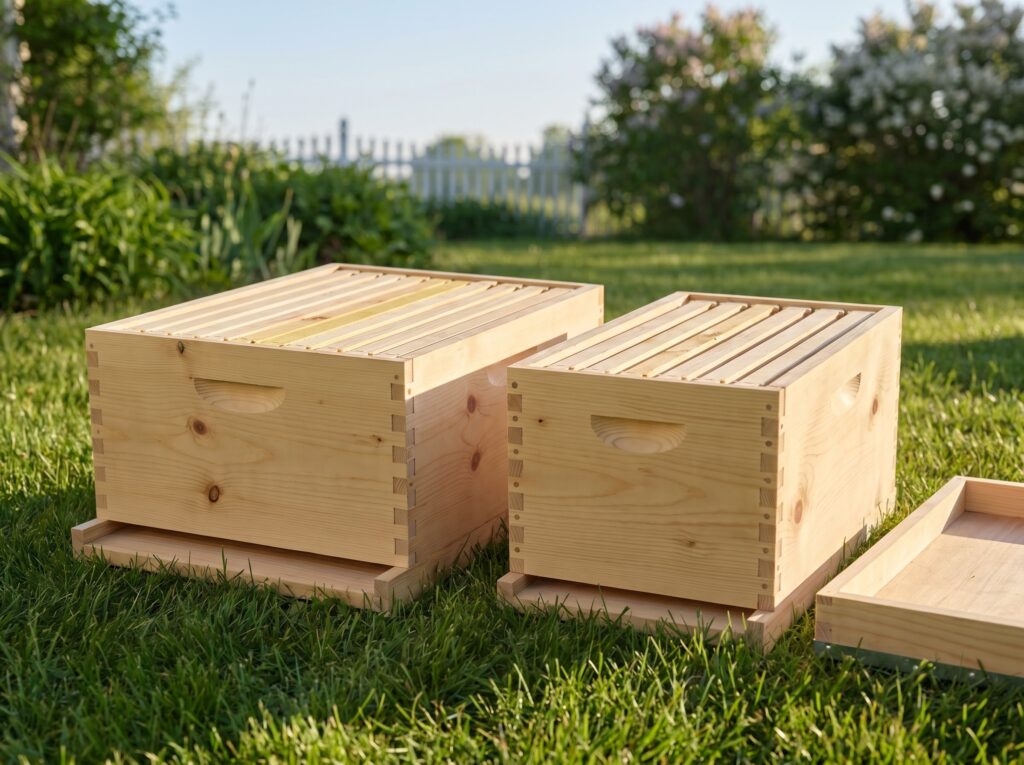
A Langstroth hive is what almost every US beginner should buy, and what nearly every club, supplier, and mentor is set up around. The parts are interchangeable across brands, replacement frames are everywhere, and the whole system of hive parts is built to add boxes upward as the colony grows.
The choice that actually affects your back is 8-frame versus 10-frame boxes. A full 10-frame deep, packed with honey and bees, can weigh 80 to 90 pounds or more. An 8-frame deep of the same height holds two fewer frames and comes in noticeably lighter, which matters every single inspection once supers stack up. If lifting is a concern, go 8-frame from the start; the size difference is covered in our breakdown of 8-frame and 10-frame hives.
Then there is the Flow Hive. The Classic model runs about $669 to $739; larger Flow configurations cost more, up to roughly $1,059. That price buys a working hive with a brood box and a Flow Super whose frames let you drain honey through a tap. It is a real hive, not a gimmick. But understand what the price does and does not buy: the Flow mechanism only changes how you harvest. It does nothing for varroa, nothing for swarming, and nothing for the inspections you still have to do on the brood nest below. You will still open the hive, still pull frames, still test for mites. Whether the convenience is worth the premium is its own decision, weighed in our take on whether a Flow Hive is worth it. For most first-year keepers on a budget, a standard Langstroth kit plus the few hundred dollars saved buys a second hive, which is the better insurance.
Protective gear, tools, and the mite kit
Protective gear is where comfort buys calm, and calm makes you a better beekeeper. A ventilated or cotton full suit lets a nervous beginner work slowly instead of flinching; a bare veil and gloves is enough for the unflappable. The fabric and fit trade-offs (and why ventilated suits earn their keep in summer heat) sit in our guide to bee suits. Gloves are a personal call: goatskin gives dexterity, thick leather gives confidence, and many keepers thin out to nitrile once stings stop rattling them.
Two hand tools do nearly all the work. The smoker calms the colony so you can open it, and a well-packed smoker that stays lit is the difference between a smooth inspection and a frantic one; fuel choices and which smokers actually hold a flame are compared in our roundup of bee smokers. The hive tool, a simple flat pry bar, separates the boxes and frames the bees cement together with propolis. Buy two hive tools, because you will set one down in the grass and not find it again.
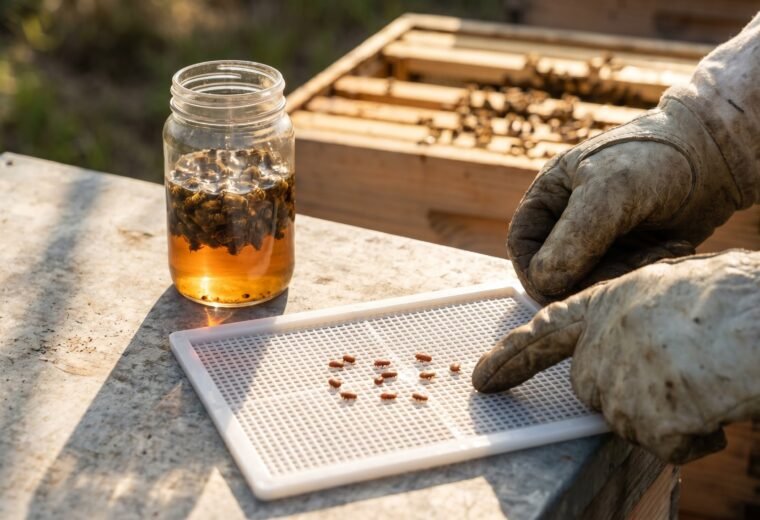
The cheapest item on this whole list is the one that most often decides whether your colony survives the winter: a varroa mite tester. It is just a cup or jar that lets you wash or roll a half-cup sample of bees and count the mites that come off. Skip it and you are flying blind on the number-one killer of US colonies. The full why-and-how, including the alcohol wash versus sugar roll, is in our mite test kit guide, and the next section explains the threshold you are testing against.
Why the mite kit and feed are not optional
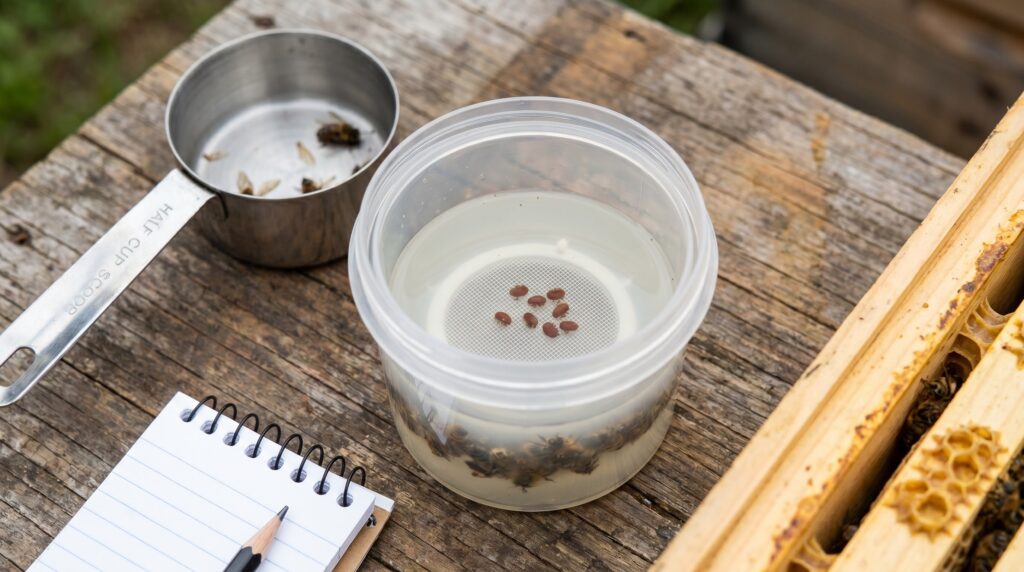
Varroa mites are the leading killer of US honey bee colonies, and the test kit is how you catch the problem before it catches your bees. The method extension services trust most is the alcohol wash. You scoop about a half cup of bees from the brood nest (roughly 300 of them), wash them in alcohol, and count the mites that drop. Mississippi State Extension calls the alcohol wash the most accurate sampling method and walks through the math: divide the mites you find by the number of bees in your sample to get the infestation rate.
The number you are watching for is small. The Honey Bee Health Coalition sets the late-summer action threshold at about 2 mites per 100 bees, which is 2 percent, and Penn State Extension frames the same goal as keeping mites at or below roughly that level. Put concretely: on a 300-bee sample, 6 mites is about 2 percent and means it is time to act. The most important test of the year comes in late summer, before the colony rears the long-lived winter bees that have to survive until spring. Let mites run high while those bees are being made and the colony often dies in winter even though the cold itself did not kill it. Our walkthrough on testing for varroa covers the wash step by step, and mite thresholds covers when each number means treat.
A quick, honest word on treatments, because this is the part where guessing causes harm: every mite product is used strictly per its label, never by feel. Oxalic acid works best when the colony is broodless, since it cannot reach mites under capped brood (Penn State notes it is most effective during broodless periods). Formic acid such as Formic Pro is temperature-sensitive, roughly 50 to 85F per the same source, and can be applied with honey supers in place, as can oxalic acid and Hopguard. Amitraz products such as Apivar require the supers off. For dosing and product choice, follow the label and the Honey Bee Health Coalition's guidance rather than a forum post.
Feed matters for a simpler reason: a brand-new colony has no comb. It cannot store food or raise brood until it builds wax, and building wax burns through sugar. So a new package or nuc gets 1:1 sugar syrup (equal parts sugar and water by weight) to fuel comb-building in spring. In fall, the ratio shifts to 2:1 to help them pack away winter stores. You stop feeding syrup before honey supers go on, so you are not bottling sugar water, and once it turns cold the bees cannot take syrup at all; then it is fondant or dry sugar. The feeders and ratios are laid out in our piece on sugar syrup ratios.
What to buy by budget tier
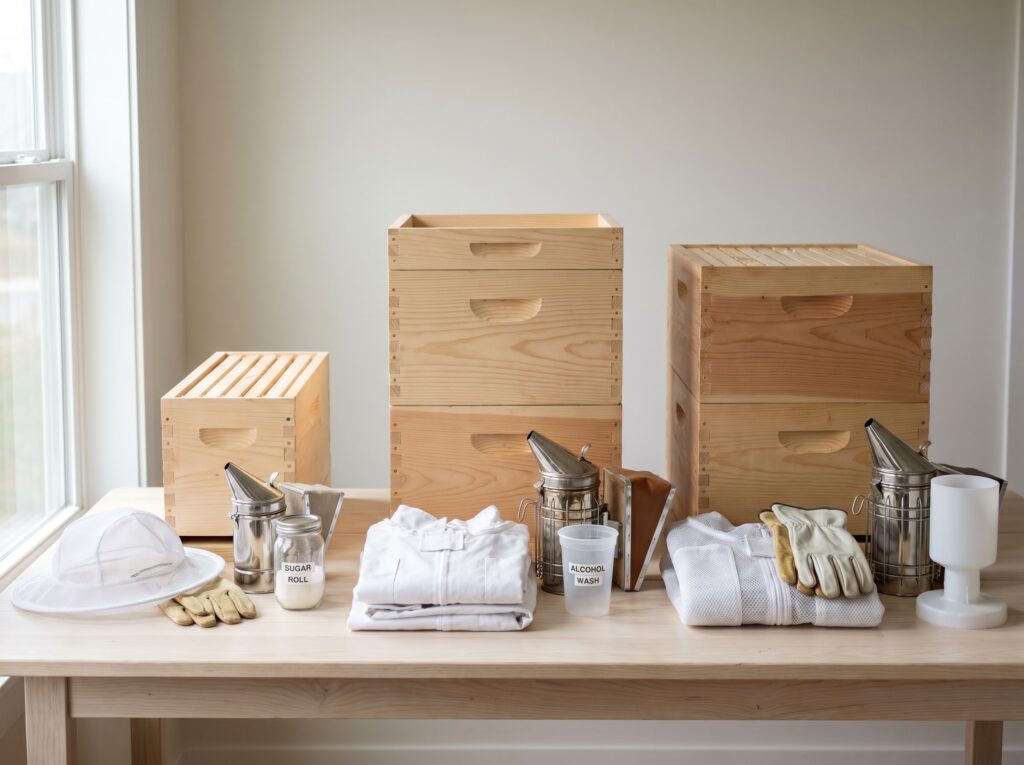
Here is the same list arranged three ways, so you can match it to what you actually have to spend. Every tier still includes a hive, protection, both tools, a mite kit, and feed; the difference is quality, comfort, and how many boxes you start with. None of these tiers includes a Flow Hive, which sits in its own category above.
| Component | Lean (about $700-$850) | Standard (about $950-$1,150) | Comfortable (about $1,300-$1,500) |
|---|---|---|---|
| Hive | One 8-frame Langstroth kit, plastic foundation | One full 10-frame or 8-frame kit, extra deep ready | Two complete hives (the smart loss hedge) |
| Protection | Veil plus jacket, basic gloves | Full cotton suit, goatskin gloves | Ventilated full suit, spare gloves |
| Tools | One smoker, two hive tools | Larger smoker, two hive tools, frame grip | Stainless smoker, multiple tools |
| Mite kit | Sugar-roll jar | Alcohol-wash cup | Alcohol-wash cup plus sticky board |
| Feed | Entrance feeder, bulk sugar | Frame or top feeder, bulk sugar | Top feeders for two hives, sugar |
| Bees | One package | One nuc | Two nucs or packages |
The Comfortable tier is the only one that starts you with two colonies, and that is not luxury. With losses running near half per year, a second hive means a dead-out in March does not end your beekeeping; you can split the survivor and rebuild. The case for starting with a pair is made in full in our look at running one hive or two.
Price your own setup: a build-it method
Catalogs change and prices drift, so rather than hand you a fixed total that goes stale, here is how to build your own number in five lines. Fill in today's prices from wherever you plan to buy, add them up, and you have a real first-year figure for your situation.
- Hive line. Price one complete hive kit (or two, if you are hedging losses). Add one spare deep box of frames; most colonies need a second box by midsummer. This is your largest buy-once number.
- Protection line. Price the suit or jacket and gloves at the comfort level you actually want, then resist the urge to trim it. A miserable beekeeper inspects less, and less inspection means missed problems.
- Tools and mite line. Smoker, two hive tools, and an alcohol-wash cup or sugar-roll jar. Small money, do not skip it.
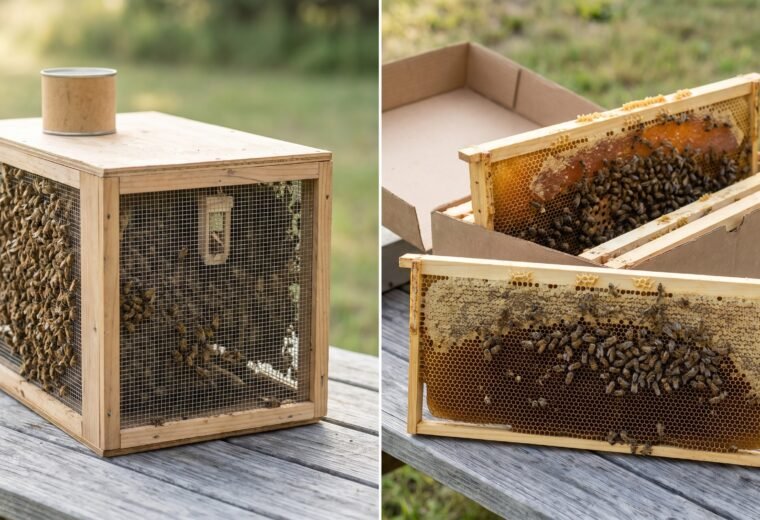
- Bees line. One package (about $140-$200) or one nuc (about $180-$300). Order in late fall or winter for spring pickup, because the good local stock sells out early. A nuc arrives as a working mini-colony on drawn comb with a laying queen, picked up locally; a package arrives as loose bees with a caged queen and zero comb. The trade-off is spelled out in our comparison of a package versus a nuc.
- Consumables line. A season of sugar, one mite treatment per the label, and smoker fuel. Budget $50 to $120 and expect to repeat it next year.
Add the five lines. A lean single-hive build commonly lands near $700 to $850; a two-hive comfortable build pushes toward $1,500. Either way, write the bees and sugar lines in pencil, because those are the ones you will pay again. When you are ready to turn this into a dated to-do list, our startup checklist sequences what to buy and order in what month.
What this list does not buy you
Two honest gaps to plan around. First, this kit does not include a honey extractor, and you almost certainly will not need one in year one. A new colony spends its first season drawing comb and building up, so first-year honey is usually somewhere between zero and 20 pounds, often zero; an established hive yields more like 30 to 60 pounds in a good year. By the time you have a real crop, you can borrow a club extractor or weigh the buy against simple crush-and-strain, which we compare in our honey extractor guide. Spending $300 on an extractor before you have honey is the classic year-one mistake.
Second, no equipment list addresses stings safely, so here is the line that matters. A normal sting causes local pain, redness, and swelling at the spot, which the Cleveland Clinic describes as sharp burning pain and swelling of the affected area. A severe reaction is different: trouble breathing, swelling of the tongue or throat, hives spreading over the body, or dizziness. That is anaphylaxis, and the Cleveland Clinic's instruction is to call 911 or go to the emergency room immediately. If you have a known sting allergy, talk to your doctor before you keep bees and ask whether you should carry an epinephrine auto-injector. No article, including this one, can diagnose you.
- Oklahoma State University Extensionused for the cost categories and bare-minimum first-year total for a beginner. https://extension.okstate.edu/fact-sheets/beginning-honey-beekeeping-equipment-and-associated-costs.html
- University of Georgia Honey Bee Programused for the core equipment roles (smoker, hive tool, veil, hive body and frames). https://bees.caes.uga.edu/beekeeping-resources/getting-started-topics/getting-started-beekeeping-equipment.html
- Mississippi State University Extensionused for the alcohol wash sampling method, half-cup sample, and the mite infestation math. https://extension.msstate.edu/publications/sampling-for-varroa-mites-using-alcohol-wash
- Penn State Extensionused for the varroa action threshold and the oxalic and formic acid treatment notes. https://extension.psu.edu/methods-to-control-varroa-mites-an-integrated-pest-management-approach
- Cleveland Clinicused for distinguishing a normal sting from anaphylaxis and the emergency-care instruction. https://my.clevelandclinic.org/health/diseases/25093-bee-sting