How to test for varroa: alcohol wash and sugar roll, step by step
Learn how to test for varroa with a 300-bee alcohol wash or sugar roll. Step-by-step instructions, mite thresholds, timing, and which method is more accurate.
Pull a frame from the brood nest, shake the bees into a basin, and scoop half a cup. That half cup - roughly 300 bees - is the standard sample for both the alcohol wash and the sugar roll, and what you do with it in the next few minutes will tell you whether your colony is in trouble. The alcohol wash is more accurate and takes about ten minutes. The sugar roll is gentler and takes a bit longer. Both are worth learning, because the method you actually do consistently is the one that keeps colonies alive.
Varroa is the leading cause of colony death in managed US hives. The Honey Bee Health Coalition's guidance and university extension programs across the country are uniform on one point: regular sampling, read against a clear threshold, is the only way to stay ahead of it. A visual hive inspection alone cannot tell you mite load. You have to count.
What you need before you open the hive
Gather your materials at home. Running back to the truck mid-sample while bees are in a basin is how samples go wrong.
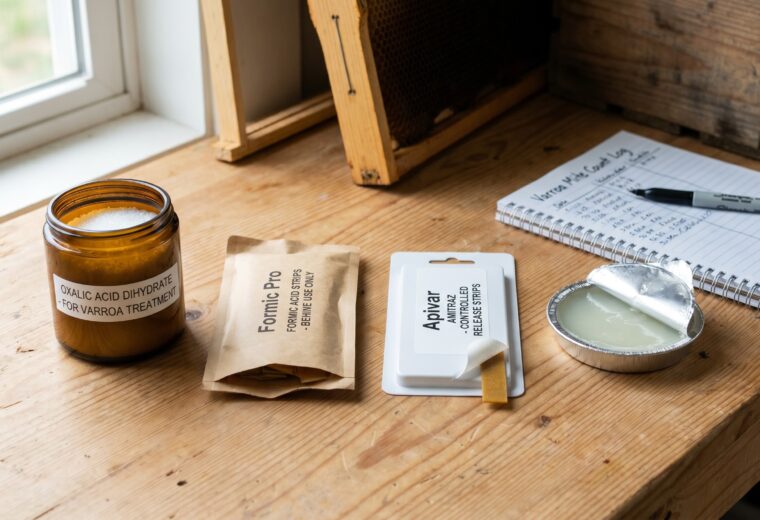
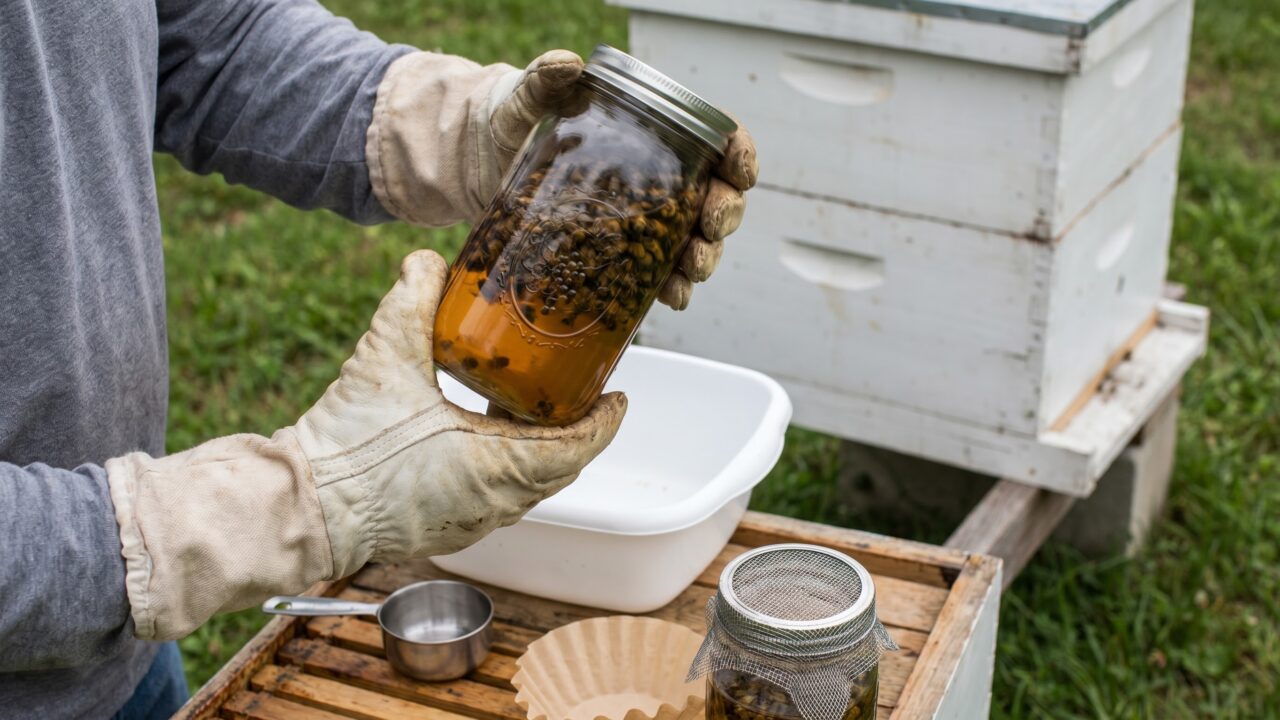
For an alcohol wash you need: a pint jar (or a dedicated mite-wash device), a second pint jar, 250 ml of isopropyl alcohol at 70% concentration or higher, an 8-mesh hardware cloth lid or a fine strainer, a coffee filter or white paper towel to catch mites, and a half-cup measuring scoop. Soapy water works as a substitute - two tablespoons of dish soap per gallon of water - though alcohol is the standard. Purpose-built alcohol wash kits sold by major suppliers combine the two-jar system in one unit and are worth the $15 to $25 if you plan to test monthly.
For a sugar roll you need: a pint jar with a mesh lid (8 squares per inch of hardware cloth), two tablespoons of fresh dry powdered sugar, a half-cup measuring scoop, and a white basin or tray. The sugar must be dry - clumped or humid sugar clings to bees poorly and undercuts accuracy.
Both methods also need: your hive tool, smoker, gloves, a queen clip or spare queen cage if you tend to spot her early, and a pen plus a simple count sheet.
Alcohol wash: step by step
This is the method Penn State Extension calls the most effective for determining whether your colony needs treatment, and the University of Minnesota Bee Lab confirms that it is more reliable than the sugar roll because fewer variables affect the result. It kills the bees in the sample, which matters less than beekeepers sometimes think - 300 bees is less than 0.5% of a healthy summer colony.
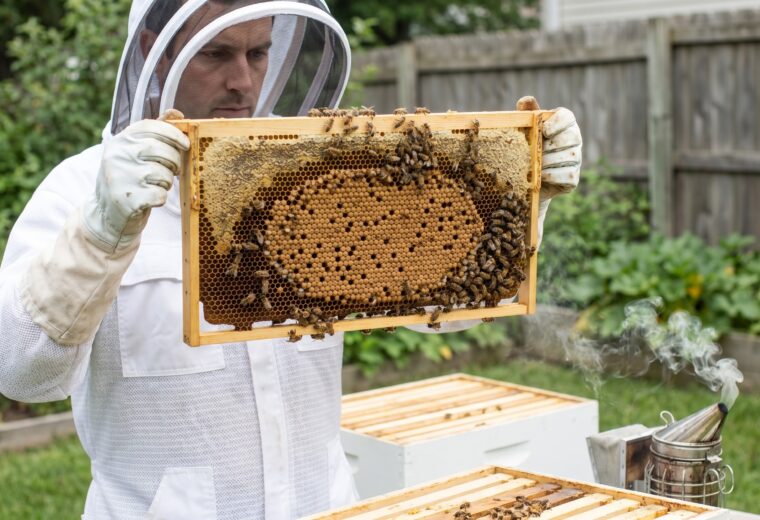
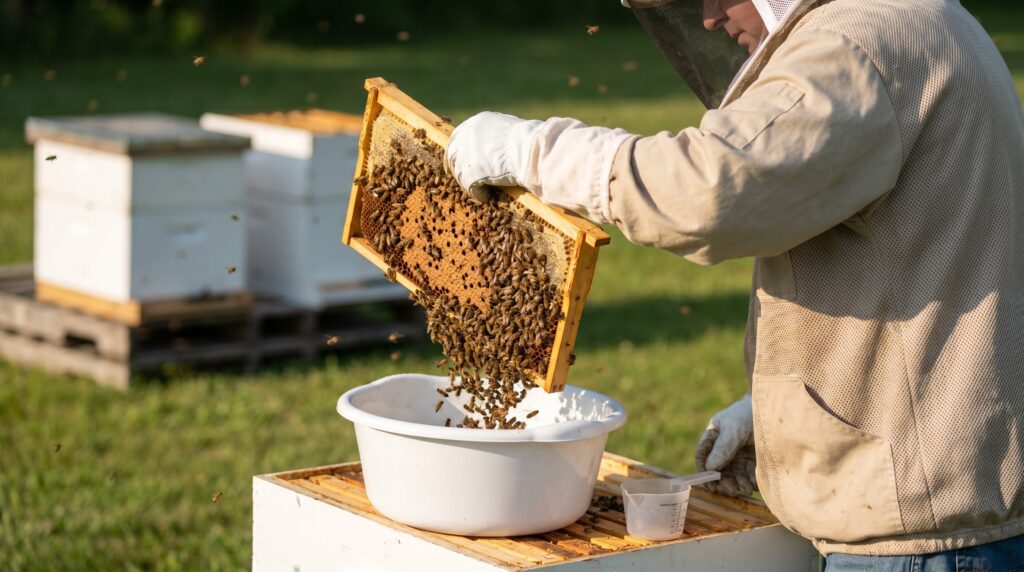
- Find a brood frame. Choose a frame with open brood and nurse bees - these are the bees most likely to be carrying mites. Check it for the queen before you proceed. If you see her, set that frame aside and work from a neighboring frame, or use a queen clip to secure her briefly.
- Shake bees into the basin. Give the frame a sharp downward shake over your white basin to dislodge the bees. Bang the basin once to consolidate them into one corner.
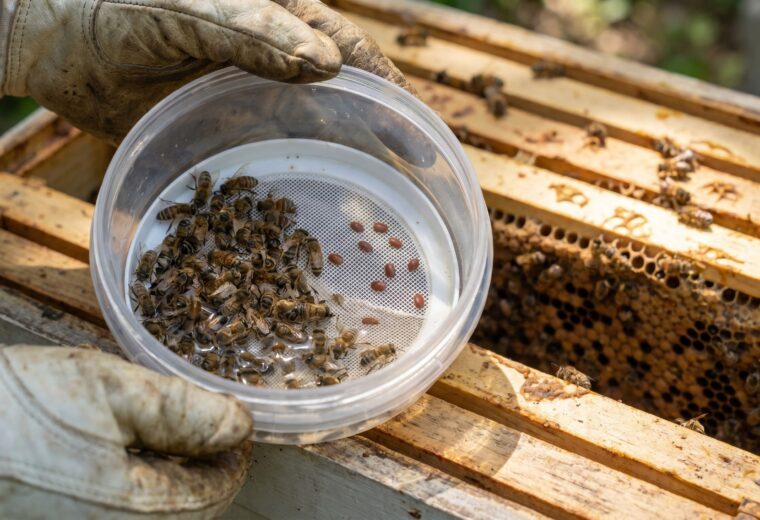
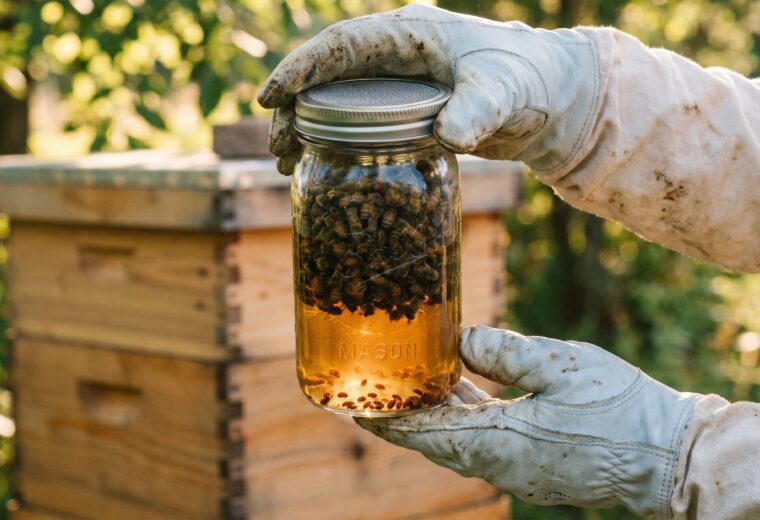
- Scoop a half cup. Use the measuring cup to scoop bees from the basin into your pint jar. Half a cup holds roughly 300 bees. You do not need to count them individually - the volume is the standard.
- Add alcohol and cap the jar. Pour 250 ml of isopropyl (70%+) over the bees. Seal with the solid lid.
- Shake for 60 seconds. Penn State Extension specifies to "shake/roll/swirl the bees in the alcohol vigorously for 60 seconds." This dislodges mites from the bees' bodies. Set a timer; beekeepers who freehand this step tend to stop at 30 seconds.
- Strain into the second jar. Swap to the mesh lid and pour the alcohol through your coffee filter into the second jar. The bees stay in the first jar; the mites pass through the mesh and collect on the filter. Some beekeepers then hold the mesh-capped jar over the filter and shake it a second time to knock any remaining mites loose - this is optional, not part of the standard Penn State procedure, but it is common practice.
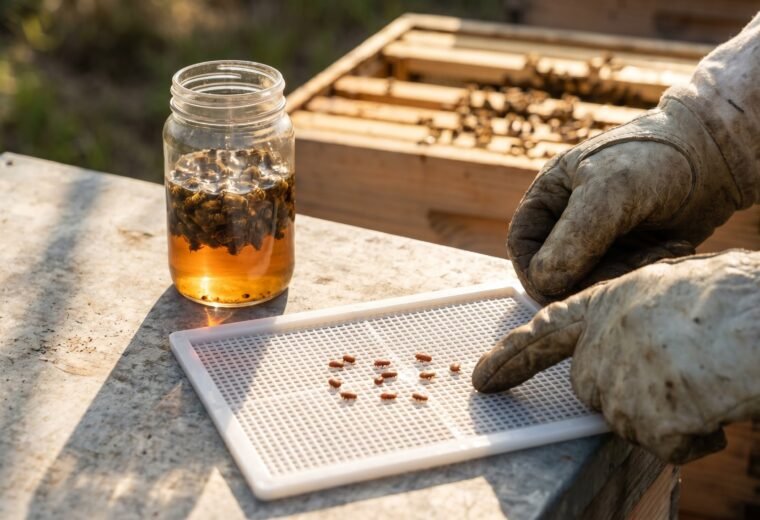
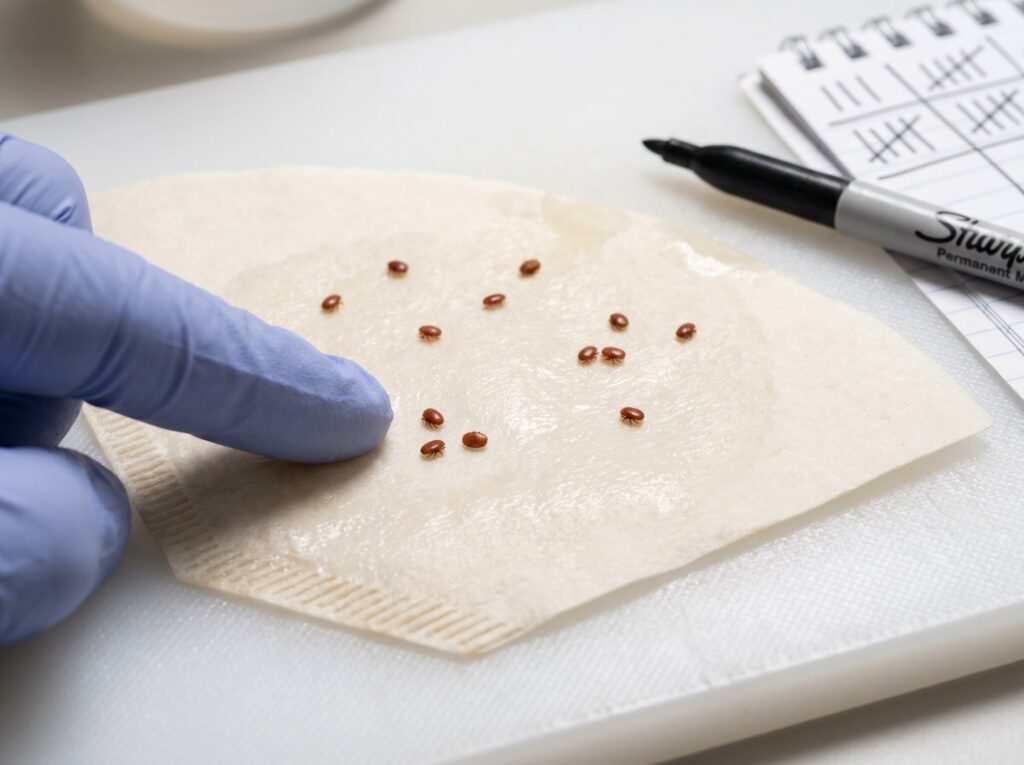
- Count the mites. Spread the coffee filter flat and count every mite. They look like tiny red-brown oval dots. Divide your mite count by three to get the number of mites per 100 bees.
Record the date, colony ID, and result. That number, tracked across monthly samples, tells you whether your mite population is climbing or stable.
Sugar roll: step by step

The sugar roll collects the same sample and produces a useful number, with two honest caveats: it undercounts by roughly 10% compared to an alcohol wash (Indiana Honey Producers research), and it is less reliable in humid or wet conditions. It also - contrary to a long-standing assumption - may not be entirely harmless to the bees in the sample. A 2025 study published in the Journal of Apicultural Research found that bees subjected to a powdered sugar shake were less likely to be recaptured five days after the procedure compared to untreated controls, suggesting some premature mortality. The bees are not immediately killed, but calling the method "bee-safe" is no longer fully accurate. That said, for beekeepers who want a field-fast count without carrying alcohol, it remains a reasonable monitoring option.
- Select a brood frame. Same as the alcohol wash - open brood, nurse bees, queen confirmed absent or secured.
- Shake bees into the basin. Bang the basin to concentrate the bees.
- Scoop a half cup into the jar. Again, half a cup equals roughly 300 bees (Penn State Extension).
- Add powdered sugar. Pour two tablespoons of dry powdered sugar through the mesh lid. Cap the jar.
- Wait one minute, then roll. Set the jar aside in shade for one minute so the sugar coats the bees. Then gently roll the jar for two minutes, turning it end over end. The goal is even coverage, not vigorous shaking. Before you open the jar, position your white basin on a flat surface where you can reach it easily - you will need it immediately after the next step.
- Return bees to the hive. Uncap the jar over the open hive and let the bees walk back in. They will clean each other and return to work.
- Shake mites into the basin. With the bees returned, immediately turn the jar upside down over your white basin and shake it up and down vigorously for 60 seconds. Mites will fall through the mesh.
- Add water and count. Spray a little water onto the basin to dissolve the sugar - mites become easier to see against the white surface. Count every visible mite.
Divide the count by three to get mites per 100 bees. Because the sugar roll undercounts by about 10%, some beekeepers add one or two mites to their total before comparing it to the threshold. That adjustment is reasonable but not universal.
Reading the number: thresholds and timing
The number means something only in context. A count of 3 mites per 100 bees in April calls for monitoring more frequently. The same count in August, with winter bees about to be raised, calls for immediate treatment.
The table below lays out how extension guidance maps mite levels to action across the season. Penn State Extension sets its action threshold at 2 mites per 100 bees (2%); LSU AgCenter and NC State Extension both recommend treating at 3 per 100 bees (3%). The University of Minnesota Bee Lab sets 1% as the target survival range and 2% as a treatment trigger. These are not contradictions - they reflect different points on the same risk curve. The table follows the Penn State 2% threshold as the conservative action point, since that is the source cited for the sample size and procedure used in this article.
| Season / timing | Mites per 100 bees | Mites in a 300-bee sample | Guidance |
|---|---|---|---|
| Spring through early summer | 0-2 | 0-6 | No treatment needed; monitor monthly |
| Spring through early summer | 2+ | 6+ | Treat; mite load will compound as colony peaks |
| Late summer (July-August) | 2+ | 6+ | Treat before winter bees are raised; this window is critical |
| Late summer (July-August) | 0-1 | 0-3 | Monitor every two to three weeks; mite populations can spike fast |
| Fall (September-October) | Any count above 0-1 | 3+ | Treat immediately if possible; winter bees are already being reared |
| Winter (broodless) | Sample not practical; monitor in January warm spells | - | Oxalic acid dribble or vapor most effective when colony is broodless |
Penn State Extension's IPM guidance is direct: "controlling mites in the fall is a major factor linked to overwintering survival in honey bees," and treatment should occur "prior to the production of the winter bees." Late August is the pivotal month in most of the US. Miss that window, and no treatment available at that point can fully protect the bees already developing in sealed cells.
For more on what your count means and how thresholds shift by region, the full threshold breakdown covers summer vs. fall limits and what to do when a colony tests above 5%.
Which method to use
Use the alcohol wash as your primary monitoring tool. It is faster in practice once you have the setup ready, more accurate, and the variable of operator skill matters less. The University of Minnesota Bee Lab puts it plainly: the alcohol wash "is more reliable than the powdered sugar roll test as fewer variables affect the efficacy."
The sugar roll has a place when you do not have alcohol available, when you are testing a hive that is particularly aggressive and a faster in-and-out matters, or when you are teaching a new beekeeper who is not comfortable with the idea of sacrificing 300 bees. In those situations, get a count - any count - rather than skipping the test entirely.
What you should not do is use the sticky board (bottom board drop count) as your primary monitoring method. Natural mite drop numbers are affected by brood cycle, colony size, and time of year in ways that make them difficult to compare between tests or between colonies. They are useful as a rough signal only, not as a number to set against a treatment threshold.
A complete look at the varroa problem - what mites do to bees, how infestations build, and which viruses they carry - is in the varroa mites overview.
How often to test
Monthly is the standard. Penn State Extension advises beekeepers to "measure the mean abundance of mites on a regular schedule, such as monthly, to determine when the population of mites found on adult worker bees is exceeding a threshold." In practice, monthly testing from April through October gives you enough data points to catch a climbing population before it reaches a dangerous level.
Two periods demand tighter intervals. First, the three weeks after any treatment - test again at that point to confirm it worked. Second, July and August, when colony population is starting to drop but mite reproduction is still running at full speed. The mite-to-bee ratio can move from 2% to 5% in four to six weeks during this period. A colony that tested clean in late June can be in serious trouble by early August if you have not checked in between.
Test every hive separately. Mite loads vary considerably between colonies in the same apiary. A colony that tests low does not tell you anything about the one three feet away.
If you are new to hive inspections and have not settled into a consistent inspection rhythm yet, the full inspection walkthrough explains how to sequence a visit so mite testing fits naturally into the frame-by-frame check rather than feeling like a separate chore bolted on at the end.
The beginner failure nobody warns you about
The single most common mistake is waiting until something looks wrong before testing. Mite damage shows up in bees well before you can see it in the hive - deformed wings, shortened lifespans, weakened immune response to viruses. By the time you are seeing crawlers on the landing board or a scattered brood pattern, the mite load has usually been elevated for weeks. A hive can look busy and full-bodied right through a rapid mite buildup in late summer.
Test on a schedule, not on suspicion. A half-cup scoop and ten minutes of your time each month is the actual work. Everything that follows - understanding what mites do, choosing a treatment - depends on having a real number in front of you.
Questions answered
Can I use rubbing alcohol from the drugstore?
Yes. Standard 70% isopropyl alcohol (the kind sold in any pharmacy) is what Penn State Extension specifies for the alcohol wash. Higher concentrations like 91% also work. The only requirement is that it is at least 70%. Some beekeepers use dish soap in water as a substitute, which works but leaves the mites harder to see on a filter.
Do I need to test a new package or nucleus colony in the first few weeks?
Packages can arrive with some mite load, and nucs almost certainly will. Testing four to six weeks after installation - once the colony has drawn comb and the queen is laying consistently - gives you a first baseline. Testing earlier than that, when population is very low, can produce misleading results because the absolute number of mites is small even if the percentage is not.
What counts as a half cup of bees?
A standard US half-cup measuring cup holds roughly 300 adult worker bees, which is the sample size both major monitoring methods are calibrated to. You do not count bees individually - the volume is the standard. Do not try to adjust the math for a smaller sample; the thresholds (mites per 100 bees) assume 300 bees and a smaller scoop produces a less reliable result.
Should I test while honey supers are on?
Yes. Monitoring is separate from treatment. You can and should test at any time during the active season regardless of whether supers are on. Testing tells you the mite level; what treatment you choose, and whether supers need to come off first, is a separate question covered in the threshold and treatment decision guide.
My sugar roll came back at 4 mites. Should I treat?
Four mites in a 300-bee sugar roll is 1.3 mites per 100 bees - below the general action threshold, but close enough to warrant a follow-up alcohol wash to confirm. Remember the sugar roll undercounts by roughly 10%, so your alcohol wash result may be slightly higher. If the follow-up wash comes back at 2 or more mites per 100 bees (6 or more mites in a 300-bee sample), treat - that is Penn State Extension's action point. In late summer, treat at the same 2 per 100 level, but without delay: the window to protect winter bees is short.
- Penn State Extensionused for alcohol wash procedure, sample size (1/2 cup = ~300 bees), 60-second shake, and monthly monitoring frequency
- Penn State Extension (IPM article)used for "alcohol washes are the most accurate method," fall treatment timing, and action threshold of 2 mites per 100 bees
- Penn State Extension (sugar roll article)used for sugar roll sample size, 2% action threshold (treat when more than 6 mites in a 300-bee sample)
- University of Minnesota Bee Labused for reliability comparison ("alcohol wash is more reliable than the powdered sugar roll test"), 1% survival target, and 2% treatment trigger
- LSU AgCenterused for the 3-mites-per-100-bees threshold and the divide-by-three calculation
- NC State Extension (Pollinators program)used for the 3-mites-per-100-bees infestation threshold